Installation Instructions...
Thank You for your interest in our software product...
Note: By getting to this
installation page, we assume that you have already received a
DVD...
or you have already installed
SQL Server 2008
Express R2
and you're ready to download and install
ProServe 2012
.
or you are considering installing SQL Server 2008 Express R2 from
Microsoft's download.
... If none of the above is true; then you might
be in
the wrong place... please
click here for home page...
Note: for most users, keep the
installations simple by accepting all default options...
Contents Index:
-
Section Windows 8 - Installing .NET
Framework 3.5 (only Windows 8 Users)
-
Section One - Installing SQL Server 2008
Express R2 from DVD...
-
Section Two - Installing ProServe 2012
(Server) from DVD or from Download...
-
Section Three - Installing ProServe 2012
(Client) from DVD or from Download...
-
Section Four - Installing Training Videos
from DVD or from Download...
-
Section Five -
Un-Installing ProServe 2012 (Server or Client)
Section One - Installing SQL Server 2008 Express R2 from DVD...
Note: If you Google "
SQL
Server 2008 R2 Express
" you may find several YouTube videos
on how to install SQL Server Express. This may be helpful before
continuing with instructions below.
-
Make sure you're working on the machine that will be the
server or main computer that will host ProServe 2012.
-
Make sure SQL Server 2008 Express or another edition of SQL
Server has not already been installed on this machine.
(it must be 2008 or newer) If so; then skip to
Section Two.
-
... Note: For Networks;
it's not necessary to install SQL Server on client machines.
... Note: For Windows 8, you must install from
the Windows Desktop UI. More.... or
Section Windows 8
... TIP: For Windows 8 - Make sure .NET
Framework 3.5 has been installed before proceeding. Windows 8
-
Insert the DVD, using your Windows Explorer
browse the DVD and Double Click the folder SqlServer2008
-
Double Click the folder that best fits your machine and
operating system... 64Bit or 32Bit
-
... for 32-Bit Double Click
SQLEXPRWT_x86_ENU.exe
for
64-Bit Double Click
SQLEXPRWT_x64_ENU.exe
-
After this loads, select the Installation
option..
-
Note: The best way to install this product;
is to accept each default
option, let it install itself...
- Follow prompts to complete installation...
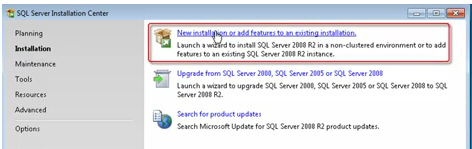
Select Installation on the left and then
New Installation
on the Right...
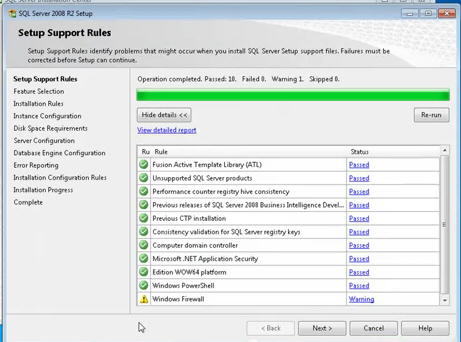
After the EULA screen, this screen will show any potential problems.
You should determine if any needs to be resolved before continuing.

Leave all options checked ON and select Next
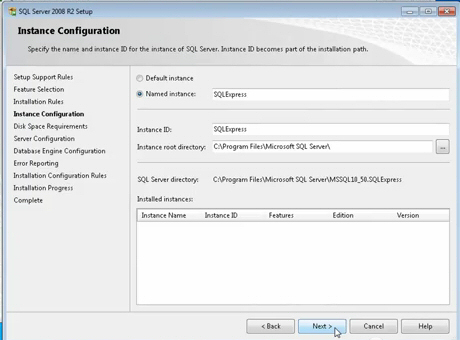
Accept all defaults and select Next.
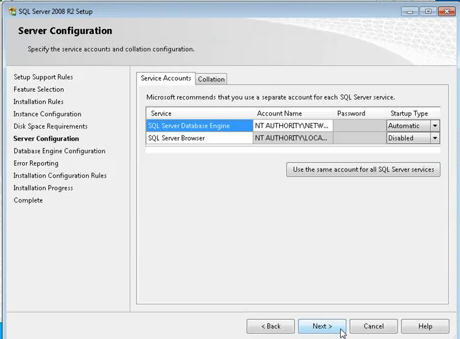
Accept all defaults and select Next....
Unless you're installing on a Network...
If so; Set the SQL Server Browser Startup Type to
Automatic...
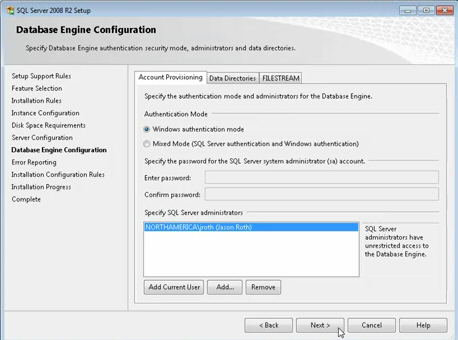
Accept all defaults and select Next.
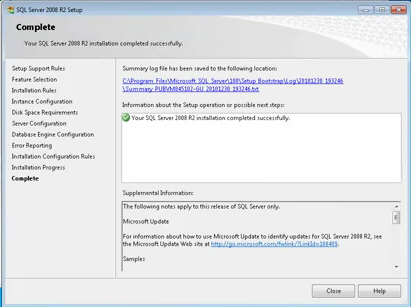
TIP: before selecting Close on
this last screen, see Setup Files Tips below...
Look for this completion window and select Close.
Setup Files Tips:
During the installation of SQL Server, the install program
creates a temporary folder under the root of C: drive with random
numbers and letters as the folder name, like 004t00500y00500tt9rr4.
This temporary folder holds all of the installation and setup files.
After selecting Close on the last screen of installation "Complete"
screen, this folder is deleted. The problem with this is; if you
need to start the SQL Server Installation Center later to reset some
features or start the install again to patch problems with SQL
Server, it will not be able to locate the installation setup files.
Therefore, the Installation Center is rendered useless. Follow
instructions below to save this folder before its deleted to avoid
this issue.
How To Save The SQL Installation Files...
-
STOP at the last screen of Installation the
"Complete" screen shown above. Do Not Select Close Yet.
-
Open the Windows Explorer and locate Drive
C: open it so you can see the contents of drive C:
-
Look for a folder name with random numbers and maybe some
letters, you may see more than one.
-
Notice the Date of those folders, this
folder should be tagged with today's date.
-
Right Click this folder and select
Copy
.
-
Create a New Folder called
SQL_Setup
- Double Click into this new folder SQL_Setup
-
Right Click inside the contents area and
select Paste. (this should paste a copy of the
temporary folder)
-
Then you can select the Close button to
complete the SQL Installation.
-
Just for fun, take a look at your drive C: again and you
should notice that this folder is now gone... Just remember when
the time comes when you may need to run the Installation Center
again that this folder is under SQL_Setup..
After Installing SQL Server 2008 - Startup SQL Server Management
Studio for the 1st time...
- Select The Windows Start button
-
Look under All Programs and locate
Microsoft SQL Server 2008
R2
-
Right Click SQL Server Management Studio
and select Run as Administrator (Vista or
Windows 7 only)
(example - yours may have R2 included in titles)
-
For Windows 8 - Right Click
SQL
Server Management Studio
from the Metro Style
Start Menu
and Run As Administrator.
-
At the login screen make sure the Server Name
is either your Computer Name \ SQLEXPRESS
-
... If not enter .\SQLEXPRESS in the
Server Name field...
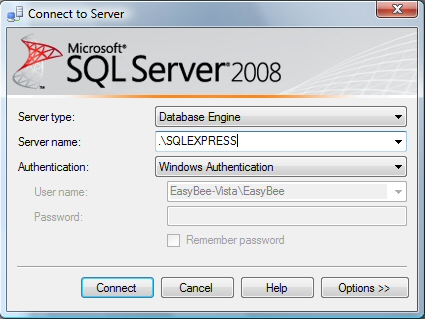
(example - Your User Name will be different)
- Then select Connect...
-
This should Connect to your default SQLEXPRESS SQL Server
Instance...
- Then Close SQL Server Management Studio...
-
.. Note: if you get an connection error
then try bulling down the Server Name selection list and select
Browse...
-
Note: Do not move on to Section Two until
you get a clean Connection in SQL Server Management Studio...
Section Two - Installing ProServe 2012 (Server)...
Part One of Two... (you must complete both part one and part two
of this section) click here for part two
-
Make sure you're working on the machine that will be the
server or main computer that will host ProServe 2012.
Note: For Windows 8, you must
install from the Windows Desktop UI.
-
Make sure SQL Server 2008 Express or another edition of SQL
Server is installed and running on this machine....
... If NOT? See Section One.
-
Insert the DVD, using your Windows Explorer
browse the DVD and Double Click the folder
ProServe2012
... Otherwise:
if you downloaded: locate the file you
downloaded with same name as below and...
-
Double Click the file
ProServe2012_Server.exe
(this should start the WinZip Self-Extractor)
-
Follow installation prompts below to complete
installation...
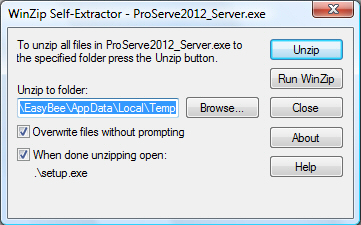
Accept all default options and click Unzip...
Note: Do NOT change any default
options here...
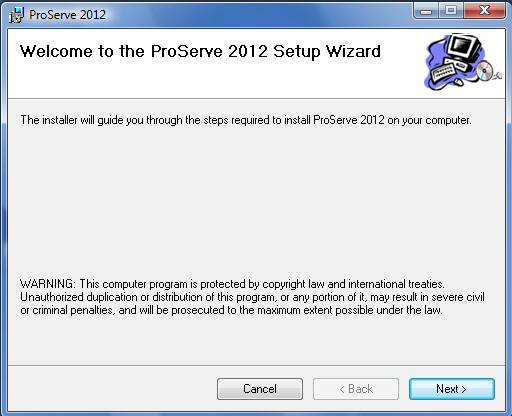
After the WinZip Self-Extractor runs, select Next...
Note: you may be prompt to install other Microsoft
software programs,
if so, please allow
installation...
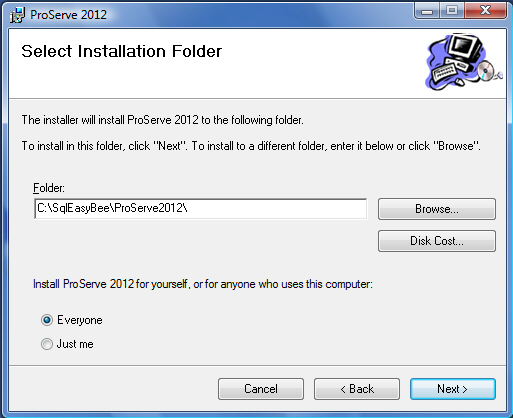
Note: This Installation Folder section is very
important...

Note: The installation folder
should be left as is,
unless you completely understand SQL Server...
The idea is; you can Share the SqlEasyBee folder
on your Server or Main Computer for networks after installation...
For Single users - this default folder is perfect, no reason to
change it...
Click Next to complete part one
of this installation...
After installation, you will find a new shortcut on your desktop...
Do NOT start ProServe 2012 yet...
Note: This installation checks to make sure
your computer has all the necessary software and drivers like .NET
Framework 3.5...
It's important to allow and install any Microsoft
software or drivers during this setup.
Part Two... (please continue with
part two)
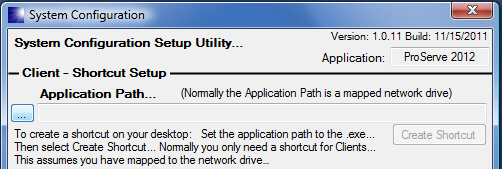
Running SetConFig for the 1st time...
SetConFig is a
System Configuration
Setup Utility
that has several purposes:
-
It allows you to Setup the Configuration File
so ProServe 2012 can connect to its databases.
-
It's used to Attach, Detach
and Reattach the ProServe 2012 Databases to the
host SQL Server Instance.
-
It also is used to Rebuild ProServe 2012
log files.
-
For Networks, it's used to setup
Clients
for access to the shared ProServe 2012
application on the server.
The SetConFig can be started from Start/All
Programs/EasyBee Software/SetConFig... Windows Vista, XP or Windows
7
On Windows 8 - from the Metro Start Menu...
Important: The SetConFig must
"Run as Administrator" in order to
attach the ProServe 2012 databases for the 1st time..
... After that, you can run from EasyBee Software folder under
Start/All Programs...
Follow instruction below to run SetConFig as
administrator for
the 1st time...
-
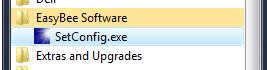
Open your Windows Explorer and locate
SqlEasyBee folder on drive C: as shown below...
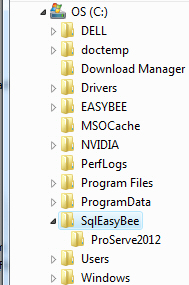
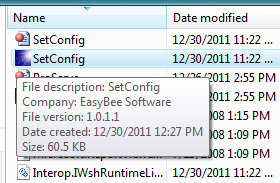
Then double click the ProServe2012 folder and
locate SetConFig file...
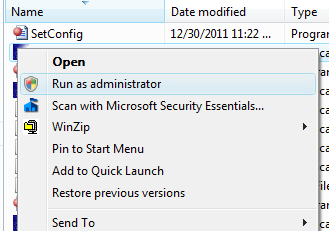
Right Click SetConFig and then select
Run
as Administrator
Make sure it's the one with the icon as shown above...
- Follow instructions below to complete Setup...
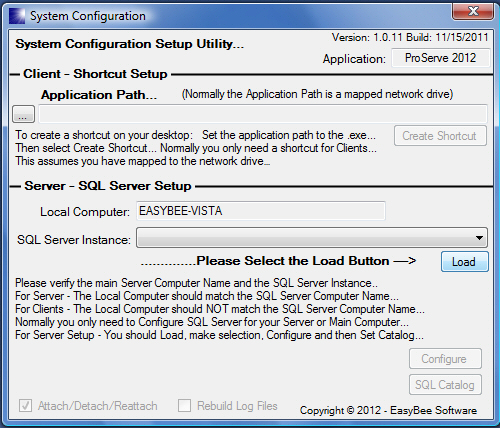
Select Load and wait until SQL Server Instance has
loaded...
This may take 10 or more seconds to complete...

After SQL Server Instance has loaded, select one...
For most users there will only be One...
Follow instructions on Screen by Selecting Configure
1st
and then SQL Catalog 2nd...
Leave all other options as is...
Close SetConfig when completed...
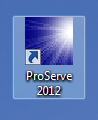 ... You're now ready to double click the ProServe 2012
icon on your desktop...
... You're now ready to double click the ProServe 2012
icon on your desktop...
Note: If you need to run SetConFig
again (and you will) you should not have to Run as Administrator...
Default Username and Password...
- Username: Admin
- Password: admin
- ...
- Both are lowercase and uppercase sensitive...
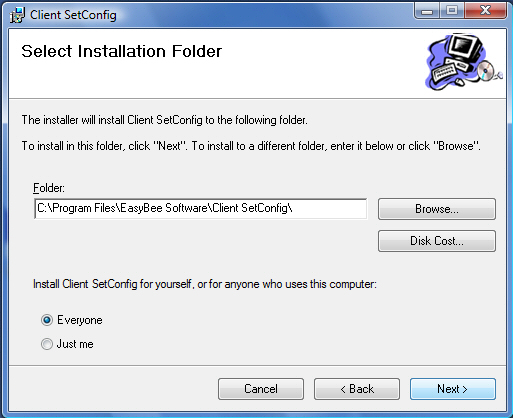
Section Three - Installing ProServe 2012 (Client)
Note: This installation is only required for
networks and should only be installed on machines (clients) other than
the Server or Main Computer hosting SQL Server and
ProServe 2012.
This is the SetConfig Utility program installation that's the same
program from part two of Server installation above...
Note: SQL Server Installation is NOT required
for Clients...
-
Note: For Windows 8,
you must install from the Windows Desktop UI and
Microsoft .NET Framework 3.5 must be installed see
Section Windows 8.
-
Make sure you have Mapped to the network
drive that's hosting ProServe 2012...
-
Insert the DVD, using your Windows Explorer
browse the DVD and Double Click the folder ProServe2012
... Otherwise: if you downloaded: locate the
file you downloaded with same name as below and...
-
Double Click the file ProServe2012_Client.exe
(this should start the WinZip Self-Extractor)
-
Follow installation prompts below to complete
installation...

Leave all default options as is and select Unzip...
Leave all default options as is and select Next...
Note: This installation checks to make sure your
computer has all the necessary software and drivers like .NET
Framework 3.5...
It's important to allow and install any Microsoft
software or drivers during this setup.
After setup has completed...
Select Start then All Programs...
Locate EasyBee Software and start SetConfig...
Select the ... (Browse) button

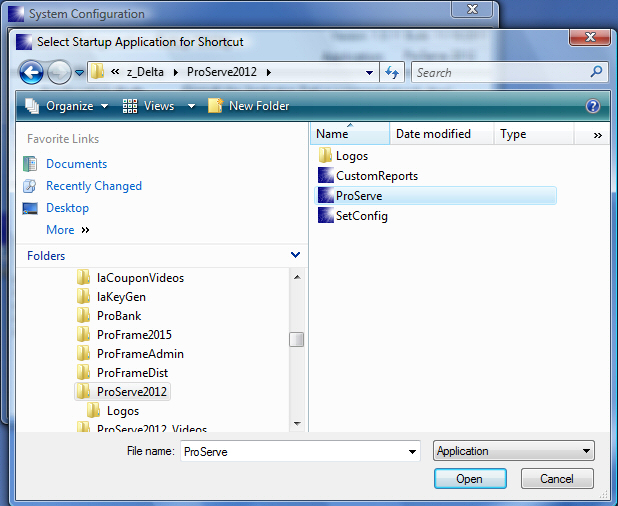
Locate the Mapped drive of Host and locate the
ProServe2012 folder...
Click ProServe.exe and select Open...
Note: You can only create a shortcut to
ProServe.exe...
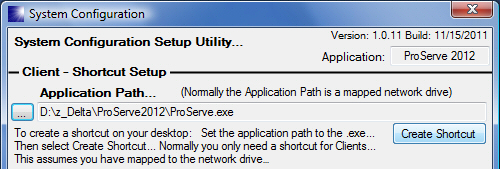
If path is selected correctly, the Create Shortcut
button should be active.
Select Create Shortcut...
Close the SetConfig when completed...
...
You should now see a new shortcut on your desktop...
Double
Click
to access ProServe 2012 from this
client...
Section Four - Installing Training Videos
From DVD
Basic Instructions for installing training videos are located on
our support page...
Click here for that page...
Section Five - Un-Installing ProServe 2012
(Server or Client)
Note: - you should follow instructions below in
order to un-install ProServe 2012 completely...
Un-Install ProServe 2012 Server
-
Run SetConFig and Detach
the ProServe 2012 databases...
-
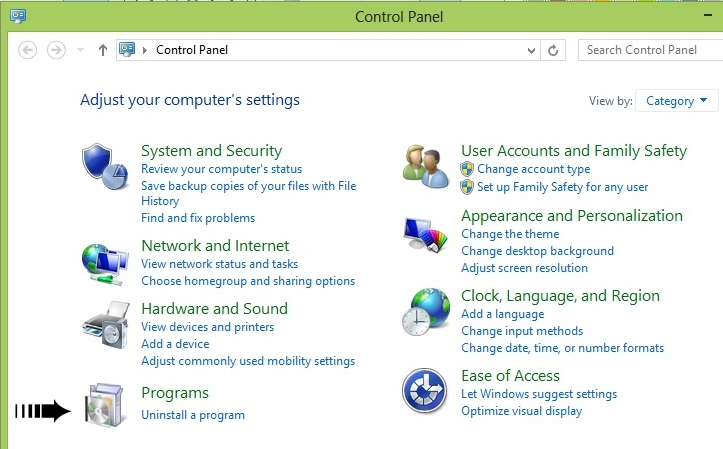
Using Programs and Features under
Control Panel
- Un-Install
ProServe
2012...
-
Using SQL Server Configuration Manager -
Stop All SQL Server Services...
-
Using Windows Explorer -
Delete
the folder called SqlEasyBee...
- Start SQL Server Services backup...
Note: It's okay to leave SQL Server 2008 Express
installed on your computer, but you could also use
Programs
and Features
under Control Panel to
un-install SQL Server 2008 Express.
Un-Install ProServe 2012 Client
-
Using Programs and Features under
Control Panel
- Un-Install SetConfig...
-
You may need to Delete the
ProServe
2012
Short-Cut from your Desktop...
Section Windows 8 - Installing .NET
Framework 3.5
Note: This application requires Microsoft .NET Framework 3.5, .NET Framework 4.5
is already installed on Windows 8 by default. You must install .NET Framework 3.5
prior to installing SQL Server and ProServe 2012. Please be assured
that it's okay and very common for both versions of .NET Framework
to be installed on Windows 8.
Installing .NET Framework 3.5 on Windows 8...
- This may require a system re-start.
-
From the Desktop on Windows 8 - Locate and Start
Control Panel
From Control Panel select Programs
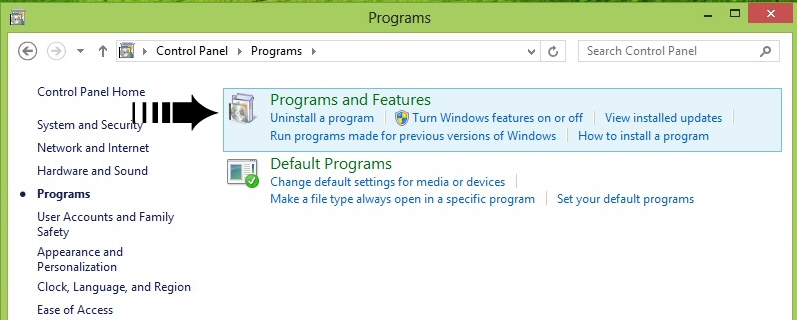
From Programs - select Programs and Features
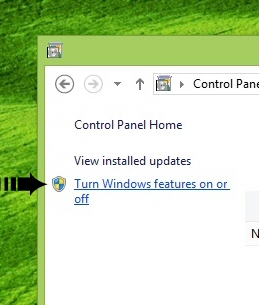
From the top left corner - select
Turn Windows features on
or off

From Windows Features - locate
.NET Framework 3.5
If Not On -
Tick it ON and click OK... Follow instruction
below.
If it's already On - Your done here, Select Cancel
and continue from Section One.
(notice .NET 4.5 is already On)
-
Follow system prompts to complete the download and
installation of .NET Framework 3.5
-
Note: This process may require a
re-start... (at least mine did)
-
After this, Start at Section One to
complete installations.
Don't hesitate to call us during business hours if you have
trouble installing this product...