Installing Activation Key File...
After purchasing ProServe 2012 you should look
for Two separate emails from EasyBee Software;
-
The 1st is the Purchase Confirmation
email that has the link pointing you to this instruction page.
-
The 2nd is the Activation Key email
that will contain the link to your Activation File Download and your
Activation Key.
After receiving the 2nd email, follow instructions below to
complete activation.
Note: Make sure the 2nd email is not getting
blocked
by Spam filters.
Note: DO NOT RUN the download link
contained within the 2nd email until instructed to do so within this
set of instructions.
Note: NO NEED to follow instructions within
the 2nd email if you're
using this set of instructions, because the instructions cross
each other and will seem confusing. Just follow one or the other not
both... (recommended to follow this set)
Activating Product:
... After receiving the Activation email... (2nd email)
- Make sure you're working on the Server or Main Computer that ProServe 2012 is installed on...
-
Shut down ProServe 2012 if it's running. (make sure no other
users are running ProServe 2012)
- Do Not run the links within the 2nd email yet...
-
Click your Start Button, open
All
Programs
and locate EasyBee Software...
- Under EasyBee Software select SetConfig...
-
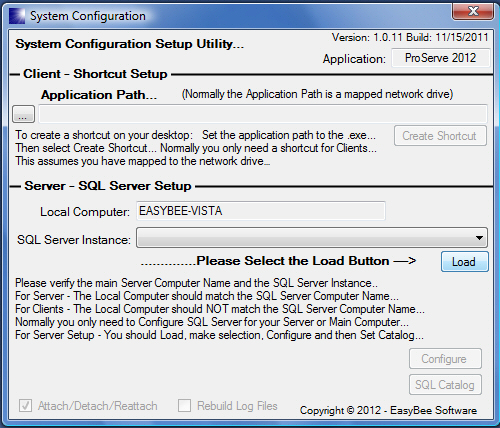
After the SetConFig program has started up... Select the
Load button...
-
After the SQL Servers have loaded notice the
Attach/Detach/Reattach
Checkbox as shown below...

Detach...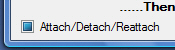 Reattach...
-
This option has Three Positions: Checked -
Attach, Blue - Detach and Off
- Reattach...
-
We want to set it to Detach (Blue) then
select the SQL Catalog button... (Do not select
Configure even though it tells you to)
- Exit this program after SQL Catalog has completed...
- ...
-
Click the Start button, locate and start
the SQL Server Configuration Manager...
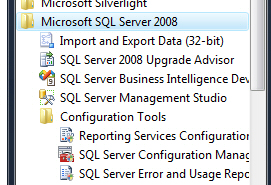
You may wish to Pen this option to your Start Menu...
You will be using this program a lot...
-
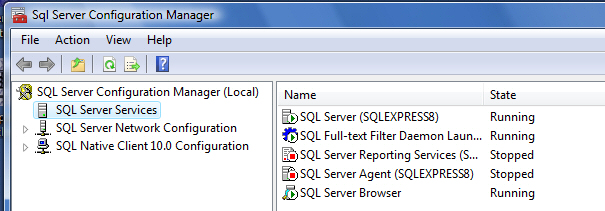
On the SQL Server Configuration Manager
screen (shown above) make sure the SQL Server Services
is highlighted on the left.
-
Now your SQL Server names may be different, most likely its
SQLEXPRESS... and that's ok...
-
On the right side - make note of each
Service that is Running
so you can Start the ones that were running later...
-
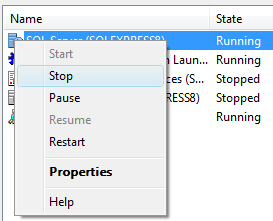
Right Click each Running Service and select
Stop (starting with the 1st one listed) as
shown below...
-
After Stopping all SQL Server Services, leave this program
running by selecting Minimize... you will need
it later.
-
Now open the 2nd email (Activation Key) that you have received
from EasyBee Software.
-
Notice the instructions, NO NEED
to follow them since you're using this set of instructions.
-
Click the link under Step 2, you should SAVE this download
so you can find it later.
-
Now locate the download file that you saved
from the email... (the name is your account number plus .exe)
-
Double Click it, make any changes to the Default Path as
required... (only if you changed it during Setup)
(during initial setup of ProServe 2012 you either
accepted the default path of C:\SqlEasyBee\ProServe2012
or you changed it)
(If you changed the default path... you must make sure to
point to the correct path of where ProServe 2012 is installed)
- Then select Unzip... After you have extracted, close that Winzip program...
-
Now Record your Activation Key located in
the 2nd email. Note: you can copy/paste that
key...
- Close that email...
- ...
-
Now we are ready to Start back up the SQL
Server Services and Attach the ProServe
2012 databases...
-
Open the SQL Server Configuration Manager
program from your Taskbar... (it should still
be running)
-
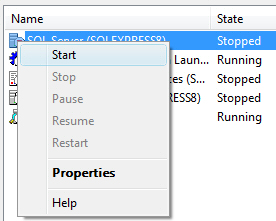
Right Click each Stopped SQL Server Service
that was Running before from previous step and
select Start... as shown below.
-
After starting each Service... Close the
SQL Server Configuration Manager program...
-
Now Startup the SetConFig program again
located under
Start - All Programs - EasyBee Software...
-
Select the Load button... (wait until
all SQL Servers are loaded)
-
This Time we want to Attach, the Attach/Detach/Reattach
option should be set to ON - Attach... (shown below)
-
Leave that option Checked ON and select the
SQL Catalog button... (do not select Configure)
-
After this has completed... Close the
SetConFig program...
-
Start ProServe 2012...
The startup should prompt the EULA screen, select
I
Agree
and Apply
-
This will reset the 14 day trail, at this screen enter your
Activation Key exactly as in the email. (or
paste)
(Be sure to press the TAB key to activate the
Apply button)
- Follow system prompts to complete activation.
If you're ready to start setting up your company and customers
click here for New Startup
Instructions...
Don't hesitate to call us during business hours if you have
trouble downloading and installing your activation key.