Manually Backing Up Database Files...
This set of instructions assumes that you have some type of
external media such as flash cards, thumb drives or external hard
drives, and that you are familiar with using Windows Explorer to
copy and paste files and folders.
Follow instructions below to manually backup
ProServe 2012
and its SQL Databases.
Warning: it is not safe to copy
or move any SQL Database while SQL Server is running...
Backup Overview:
- Detach ProServe 2012 SQL Databases from SQL Server...
- Stop SQL Server...
-
Copy/Paste the ProServe 2012 SQL Databases from and to some
type of external media such as thumb drives or hard drives.
- Start SQL Server...
- Attach the ProServe 2012 SQL Databases to SQL Server...
Backup ProServe 2012 and its SQL Databases:
- Make sure you're working on the Server or Main Computer that ProServe 2012 is installed on...
-
Shut down ProServe 2012 if it's running. (make sure no other
users are running ProServe 2012)
-
Click your Start Button, open
All
Programs
and locate EasyBee Software...
- Under EasyBee Software select SetConfig...
-
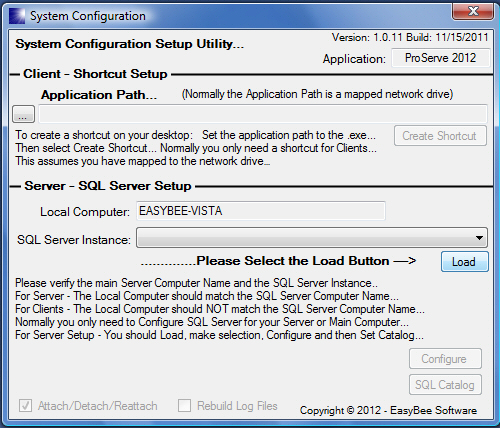
After the SetConFig program has started up... Select the
Load button...
-
After the SQL Servers have loaded notice the
Attach/Detach/Reattach
Checkbox as shown below...

Detach... Reattach...
-
This option has Three Positions: Checked -
Attach, Blue - Detach and Off
- Reattach...
-
We want to set it to Detach (Blue) then
select the SQL Catalog button... (Do not select
Configure even though it tells you to)
- Exit this program after SQL Catalog has completed...
- ...
-
Click the Start button, locate and start
the SQL Server Configuration Manager...
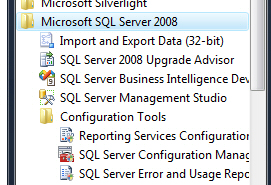
You may wish to Pen this option to your Start Menu...
-
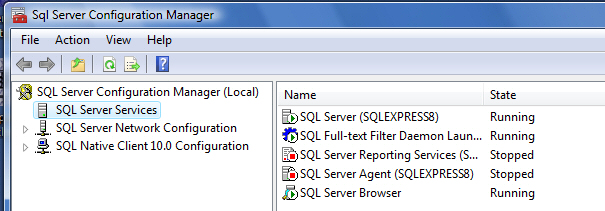
On the SQL Server Configuration Manager
screen (shown above) make sure the SQL Server Services
is highlighted on the left.
-
Now your SQL Server names may be different, most likely its
SQLEXPRESS... and that's ok...
-
On the right side - make note of each
Service that is Running
so you can Start the ones that were running later...
-
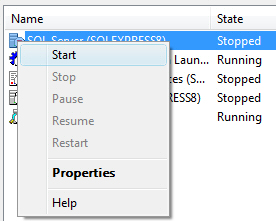
Right Click each Running Service and select
Stop (starting with the 1st one listed) as
shown below...

-
After Stopping all SQL Server Services, leave this program
running by selecting Minimize... you will need
it later.
-
Now you're ready to backup the ProServe2012
folder along with the SQL Databases...
-
Using Windows Explorer locate and Right Click the
ProServe2012 folder then select Copy...
-
Using Windows Explorer locate and double
click the external media such as thumb drives, flash cards
etc... etc...
-
Locate and double click any special folder you may have
created and right click
then select Paste...
Note: you may be prompted with a confirmation
screen...
-
After paste has completed,
verify
that you have good copies of each SQL Database
including associated log files.
1) ProServeSystem
2) ProServeCustomer
3) ProServeInventory
4) ProServeOrders
5) ProServeGeneral
6) GenLedger
7) akSystem
- ...
-
Now we are ready to Start back up the SQL
Server Services and Attach the ProServe
2012 databases...
-
Open the SQL Server Configuration Manager
program from your Taskbar... (it should still
be running)
-
Right Click each Stopped SQL Server Service
that was Running before from previous step and
select Start... as shown below.
-
After starting each Service... Close the
SQL Server Configuration Manager program...
-
Now Startup the SetConFig program again
located under
Start - All Programs - EasyBee Software...
-
Select the Load button... (wait until
all SQL Servers are loaded)
-
This Time we want to Attach, the Attach/Detach/Reattach
option should be set to ON - Attach... (shown below)
-
Leave that option Checked ON and select the
SQL Catalog button... (do not select Configure)
-
After this has completed... Close the
SetConFig program...
- Backup is complete...
To Restore: you would perform the same
thing except you would Copy from
inside the ProServe2012
folder on the external media and then Paste
inside the ProServe2012
folder on your main drive.
Note: inside is the key word here...
(don't try to restore the entire folder called ProServe2012)